
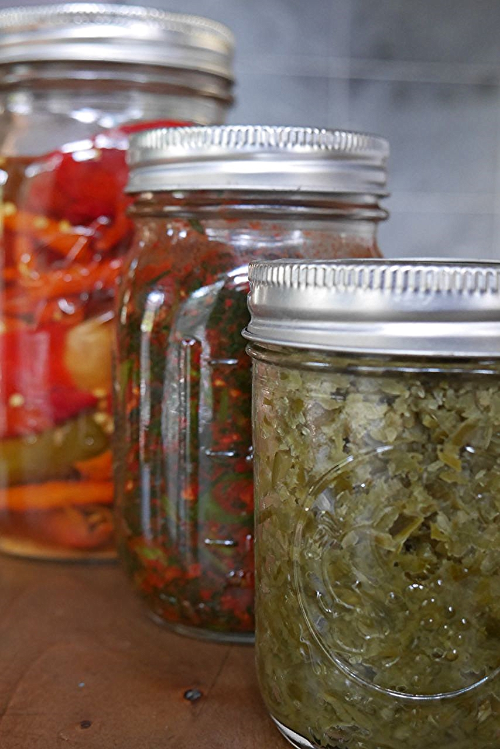
These 3 ferments are each fermenting simply in a jar that is sealed tight and burped daily. From L to R, brining peppers for hot sauce, nettle kimchi, garlic scape paste.
“Submerging in Brine—Conquers Evil Every Time!” Wise words from Fermento and Brine, superheroes of the vegetable underworld.
I know I sound like a broken record. Is that still a saying? Eek…Broken iPod stuck on repeat just doesn’t have the same ring. Anyway, point is keeping your ferments anaerobic is the trick to a successful ferment. How you go about that is a personal preference more than anything. And nearly every day I see a creative new lid or weight or contraption to help you keep the ferment submerged, let the CO2 and any contaminants out. I have already reviewed a few things on this blog, like simple handmade jar weights, and I hope to continue to share interesting ways of solving this problem.
In this post, though, I want to share the two low-tech, simple, no cost methods that I use regularly when fermenting my experimental batches. I use these methods for ferments that are 1-quart or smaller. I have used both of these methods in ferments that are in half-pint jars. These tiny ferments are not juicy cabbage or veggie ferments but instead concentrated herbal or super spicy ferments that tend to be dry.

This nettle ferment has been fermenting for 2 days under a water-filled bag for weight. It is looking good, notice the color of the nettles darkening.
One popular way is to use the water bag method. It works well for very small ferments and very large ferments. I know a few folks who use this same method in 55-gallon drums of kraut, just a much bigger tougher bag. The important thing with this method is to leave space for the bag in the jar—a good rule of thumb is to fill the jar about ¾ full and leave the top quarter for the bag. You will top the pressed ferment with a quart-sized ziplock bag; the heavier freezer style bag is preferred. To do this open the bag and place it in the jar on top of the vegetable mixture, pressing it onto the surface and around the edges. Fill the bag with water; you will see it seal the ferment as it adds weight. When the water is at the level of the top of your jar, seal the bag.
Note: Some folks are more comfortable filling the bag with brine so that if the bag leaks the water won’t weaken the ferment. This is not a concern for me. It has only happened once, in the hundreds of times I have done this, and it just isn’t worth the cost of the salt. I do use heavy bags and if I am reusing one I fill the bag over the sink first to test.
As you are fermenting you will watch the ferment for air-pockets; you can often adjust the bag, pushing a little to release the air. Sometimes you will need to remove the bag and press the ferment back down. Then you will rinse the bag with water and replace.

This is a ginger ferment with a bag on top, you can see the air-pockets in the ferment and bubbling out along the side of the plastic bag. There are very few air-pockets and the ferment is actively pushing them out. I would watch and if more develop press out by removing the bag and pressing with a clean utensil. Rinse outside of bag and replace. There are so few air-pockets you could also by run a chop-stick between the bag and the side of the jar and gently press to allow air to escape

Notice the air spaces on the upper part of this fermenting garlic scape paste, open the lid and press down with clean utensil. Replace lid tightly for the burping jar method
The other method, which I am calling the burping jar method for lack of a better name, I have only started using in the last 9 months. For the very small, very thick ferments I have decided this is great—about as simple as it gets. I have used it successfully with (or in) everything from juicy kimchi and briney pickle ferments to dry herbal rubs. (Sometimes with these dry ferments I like to cartouche the top of the ferment—which is topping it with a piece of plastic sealed tightly against the surface.) What I haven’t done is used this method in anything larger than a 2-quart ferment. This is not to say it doesn’t work, I just haven’t tried. Once I get to the larger ferments I love my water-seal crocks. I have found the trick to this method is leaving very little air space.
Simply fill a jar that is appropriately sized to the ferment mixture you have. Place the ferment in the jar, pressing out all air-pockets. Seal tightly with the lid. Place on counter to ferment. Check your ferment daily and crack the seal just a bit to allow the gases to escape and reseal. Some ferments may be more active and you may need to do this twice a day. You will know this if your lid is bulging or if when you release the gas, brine bubbles out. Be sure to press down this or any other ferment that is forming air-pockets. Generally you don’t have to press down the ferment as often as you have to release gas bubbles. Some ferments will hardly create any gas and need much less burping; don’t let that concern you—the process is still working.
In both methods just watch for the air-pockets and don't feel shy about getting into your ferment and pressing it down with a clean utensil.
Easy, right? You got this. Here are some fun recipes to get you started. Carrot Burdock Kimchi, Fermented Celery Mint Salad, or Fermented Sweet Potatoes. If you feel like you need to step back and just get a handle on fermentation or have the comfort of a class that you can take whenever you like and watch as many times as you like, its all your journey and we are always here to help.
