fermentation

Make Garum Like a Roman :: Garum Recipe

A well preserved garum shop in Pompeii has given researchers not only more clues to the production of garum but another bit of evidence to back up an August eruption date of Mount Vesuvius. Alfredo Carannante analyze.jpg

Here is a Garum recipe that is an extension of our previous post about Roman garum making in Barcino (modern Barcelona) ancient times. At its most basic garum (also sometimes called liquamen) is seafood, salt, and time. Roman makers though, we imagine, were looking for competitive edge and some shoppers for unique flavors. Of course, the choice of sea foods was paramount in flavor and likely ultimate price. We’ve read in numerous places mackerel made a good common garum, including Pliny. The best according to a 10th century book of agriculture the Geoponica was made with tuna innards, blood and gills (full utilization in action). However, the maker might include wine and herbs. One ancient recipe translation we read called for highly aromatic dried herbs that line the base of the fermentation vessel, then as fish and salt are layered so are more herbs.  The Barcino “factory” was right next door to a winery so I can see a partnership with less than ideal wines going into the garum.

The following recipe is a traditional fish based garum if you are interested in a modern spin on this umami sauce you can learn to make a bone marrow garum here.

In our research recipes layered salt on the fish. The same Geoponica recipe is roughly 12.5% ratio (8 parts fish to 1 part salt) but we found the flavor crisper and cleaner at a 18% salt by weight of fish ratio. Ancient recipes used significantly more salt than most people do today. Remember, salt was the preserving mechanism and the fermentation control, and it wasn’t something people couldn’t get away from because it was hidden in processed foods. Garums and other preserved nutritionally dense foods where the processed foods and the way the fresh foods were salted.

Heat is also a consideration. The ancient recipes all call for some sunshine and our modern sensibilities know that enzyme action is faster and most efficient around 138°F/59°C. These are the temperatures we use to speed up koji-based ferments. Temperatures in different regions might also contribute to the varying times prescribed—from 20 days to 6 months.


2 pounds (900 grams) raw mackerel, or other raw fatty fish (sardines are another good choice)

5.7 ounces (162 grams) salt

Optional dried herbs


1.     Chop the whole fish up, blood and guts and all.

2.     Mix thoroughly with the salt and optional herbs. Everything should be coated.

3.     Place mixture in a fermentation vessel. If you have an amphora go for it, otherwise use a half-gallon or gallon glass jar. Lid finger tight.

4.     Keep in sun, or warm, if possible. Warmth will move things along.

5.     Stir daily for the first two weeks. The more you stir the better. If you want to increase the surface area which will help with the enzymatic break down, you can mix it with a hand blender if you want to.

6.     Allow to ferment for about 4 months at room temperatures, stirring occasionally. It will go faster if you keep it warmer than that. The mixture will completely dissolve over time, if you don’t blend it you will still see the bones.

7.     It will separate and the liquid will be a variation of a clear amber color.

8.     Strain off the liquid. Use a coarse strainer first and then a fine strainer and finally a sanitized dense cheese cloth.

9.     Bottle the liquid. It will last indefinitely. 

What is Garum? Discovering Ancient Roman Fermentation beneath the streets of Barcelona

If you don’t recognize the name Garum you might have tasted, or at least smelled, fish sauce from southeast Asia. Other names for garum fish sauces are liquamen, allec, or muria, but we suspect it is less likely you have come across those names. Two thousand years ago garum was very popular in the Roman Empire, having probably been introduced to the Roman palate after they conquered Carthage, across the Balearic Sea in what is now Tunisia. The fermented fish sauce garum was a staple for all levels of roman citizenry. Besides its concentrated umami punch it’s also an amazing way to preserve an ocean’s perishable abundance for a long period of time. The secret to its longevity is in the process, which you might find fascinating, impossible or just a little gross. More on that in a moment.

In 2019 we were invited to Spain to teach different fermentation techniques, including making miso, hard cider and fermented condiments. So, on our last day in Barcelona we decided to get away from fermentation for a few hours and walk across the city to the Gothic Quarter to find the Picasso Museum. Walking through the tight cobblestoned streets of this old part of Barcelona you can easily imagine a scene from the middle ages, or for Christopher something from Monty Python’s Holy Grail. It feels old, worn yet solid as the giant blocks of stone that make up many of the walls. Upon finding the museum we realized a lot of people had already had the same idea and it would be many hours before the next tickets were available. So we did what we usually do in new places and wandered around. That’s when we found something amazing completely by accident.

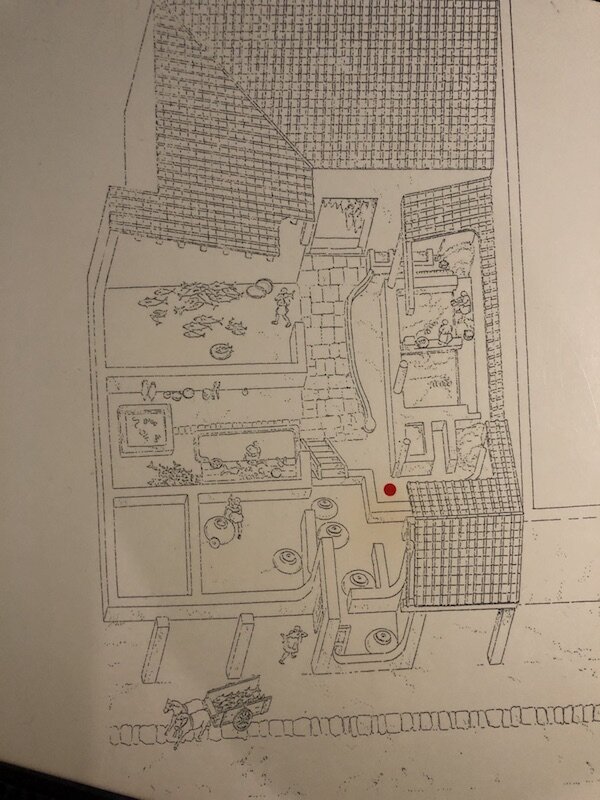
 Just a few minutes’ walk down a couple of narrow streets we randomly walked into the yawning vastness of the Placa del Rei, a square surrounded by the Palau Reial Major or Grand Royal Palace. It was sunny and the square and massive spreading steps to one end were covered with couples and families taking in the sun’s rays or enjoying a small bite to eat. Kirsten noticed the simple sign and being the more adventurous one convinced Christopher his stomach could wait until they checked out this Museum of the History of Barcelona. We checked in our backpacks into lockers, grabbed English versions of the handheld audio tour wands and were escorted into an open elevator. Two floors down we stepped out into an underground Barcelona of 2000 years ago, the roman fortification of Barcino. Painstakingly excavated for more than 30 years below the palace above and featuring among other things the remains of a very old fermentation business it takes a few minutes for you to take in what your eyes are seeing. Elevated walkways above the ruins allow for you to basically hover a few feet above over 43,000 square feet of ruins, including a winery and a factory that produced a fermented fish sauce called Garum. (See the artist rendering in the slide show.)

Alright, remember the process, which you might find fascinating, impossible or a little gross? We are in the find-it-fascinating camp, but you be the judge. If you find yourself in the fascinating camp check out this recipe. To understand what is happening in garum fermentation you need a quick anatomy primer. Organisms have in their guts microbes that break down the foods ingested to supply themselves and their host with energy. This happens in halibut as well as in a human. These microbes stay within our guts, keeping their activity focused on what we eat and not on ourselves and the same goes for the fish these early Spanish fisherman were catching. However, if you chop the fish up and throw everything in a big vat with layers of salt, these microbes break down the proteins and fats of the fish, sea urchins and whatever ends up down in there to liquidy amino acids, fatty acids and the bones. It’s the animals’ own digestive juices turned upon themselves. Perhaps a cautionary tale to remember to feed your gut microbes within you well, otherwise, well…

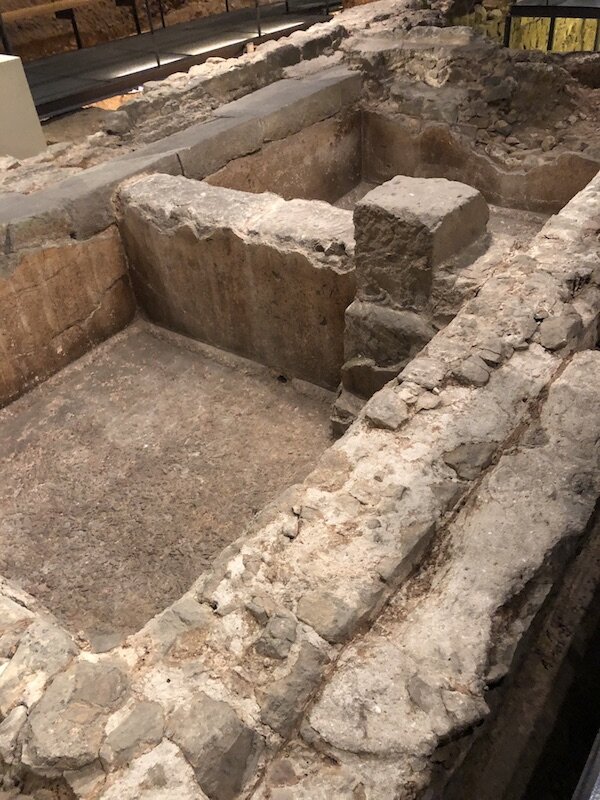
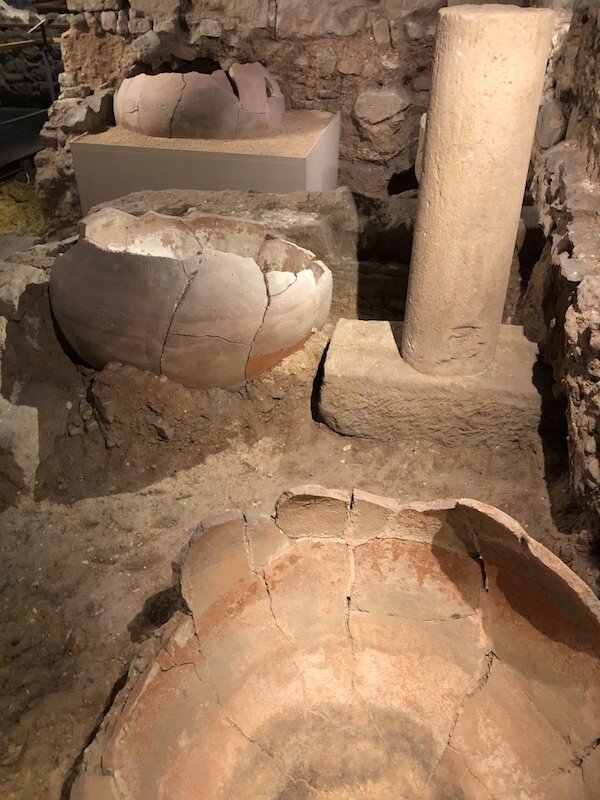
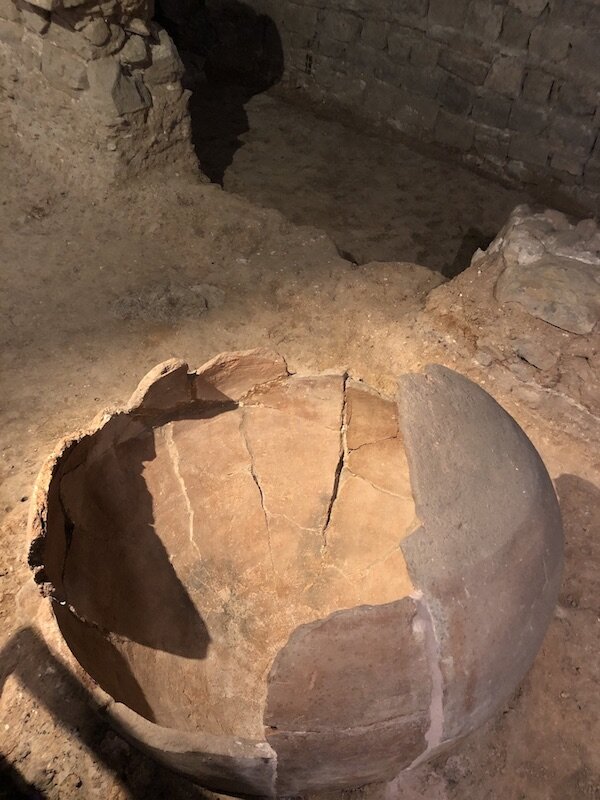
The initial salted stage set up the fermentation was in large vats cut out of the limestone and sheltered from the rain and sun by awnings of sorts. (See the rectangular stone tubs in the slide show.) After some time through a series of connected troughs and drains the fermented fish mash was transferred to smaller containers that would have been outside on the patio to further condense in the sun. Beside these were the well-preserved remains of mortars that were used when the finished garum was transferred to massive clay pots, called dolia, on raised platforms for storage and sale. (In the slide show these are the two views of huge round pots.) Remember the bones? Those were fished out (sorry for the pun) and ground up in the mortars to make fertilizer or as an amendment to animal feed. An intricate series of stone gutters carried whatever was left off after washing between batches, likely flowing into the local waterways to become nutrients. A true zero waste fermentation operation and likely ran for hundreds of years judging by the layers of flooring tiles that reflect many renovations of the factory.

Now that you know more if you are thinking you are leaning toward the gross camp don’t beat yourself up about it. People have had strong opinions about garum for at least the last 2,000 years. Pliny the Elder, a fellow author described it as “that secretion of putrefying matter” while his contemporary Seneca piled on the garum hate train to ask “Do you not realize that garum sociorum, that expensive bloody mass of decaying fish, consumes the stomach with its salted putrefaction?”  Not exactly inviting is it? One of the biggest challenges for some isn’t so much how it’s made but the smell. Make it outside in a shed, on a balcony, or any place that your loved ones (and neighbors) won’t be offended. Also, if you are making a traditional garum with all the animal including the head and organs make sure its fresh. Believe it or not starting out with fish that doesn’t already smell fishy is helpful. This is not a place to decide to use the fish too far gone to eat otherwise. If you know that you want to make an amino sauce, or modern garum you can replace the fish gut microbes and enzymes altogether by bringing in a new team.  Sweet floral smelling Koji, aspergillus oryzae, which you can read about all about in our book Miso, Tempeh, Natto and other Tasty Ferments can offer its enzyme superpowers to break down proteins in similar ways. For these modern garums koji is used with a concentrated salt brine and protein.

If you want to explore the world of modern garum you can get started here with this class to make Bone Marrow Garum taught by Meredith Leigh. To read more about fish sauce head to this article.

Cider Chat on The Big Book of Cidermaking

The Big Book of Cidermaking was released on September 1, 2020. We had a great in-person tour planned for the release of this book, which was originally going to launch on June 9, 2020, we’d hoped that by fall we could still go out and talk cider throughout the nation. As you know by now, that was serious wishful thinking. Like all authors with new books in 2020 we didn’t tour, we didn’t read in bookstores nor meet any of you and sign your copies. We stayed home and stayed safe.

And we did lots of interviews over Zoom, like all the other authors. In the beginning book store employees seemed excited about the new format and the ability to reach so many more people (anyone in the world with a connection) not just their regulars that came in the doors. Here is our first conversation with Ria Windcaller on her podcast Cider Chat. It was a great start because Ria is well known and well respected in the cider community, and she was a pleasure to talk with.

In the chat you will learn more about our farm, our apple orchard, our cider cave, and our decades-long fall tradition of making apple cider by hand, cranking and squeezing baskets upon baskets of our apples in our wooden and steel double-barreled cider press. It defines autumn for us. If you would like a signed copy just order one or two and we will get it out to you today.

We will be adding a cidermaking course on the fermentation school this summer so sign-up to the school for free so that you will get the notification when it releases.

Listen also at iTunes, Google Play, Stitcher (for Android), iHeartRadio , Spotify and wherever you love to listen to podcasts.

BigBookCidermakingCoversmall.jpg

Myanmar-Style Shan Soup Recipe

IMG_2995.jpeg

This soup also is a preview of a simple legume ferment from our upcoming book on fermented legumes and grains. We are super excited to announce that is what we have been working on all year (much of why you haven’t heard much from us.) Just this week it is out there in the big world with a beautiful cover and ready for pre-order. In it we have taken the mystery out of some of the world’s most delicious and unique ferments—including koji, miso, natto, and tempeh—making them easy with step-by-step instructions.

We hope you enjoy the recipe and the soup warms you up.

Cheers,

Kirsten and Christopher


Myanmar-Style Shan Soup

Yield: 4 good-sized bowls of porridge

Fermentation: 12 hours for the first ferment and 3 hours for the second

Gluten-free, vegan

During our trip to Myanmar, we had planned to visit the region in the northern part of the country where tea leaves are fermented, which is home to many different ethnic groups, several with their own standing armies. We had to change our plans at the last minute because fighting broke out between Myanmar’s government army and one of those regional armies, cutting off our access to the tea villages. We found tea plantations and the fermentation we were seeking, including this tofu, in other parts of the country.

In Burmese, this soup is called hto-hpu new, which either means warm tofu or hot tofu. We got various translations and, depending upon where we were eating it and which hot chile had been added, it did range from warm to very hot. This is a great base for some interesting soup bowls.

8   cups water

2   cups chickpea/garbanzo flour

1   tablespoon peanut oil

1   teaspoon salt

½ teaspoon powdered turmeric

Hot sauce (optional), for topping.

Chopped cilantro, cooked rice noodles, chopped roasted peanuts, blanched greens, or finely sliced shallots (optional), for topping

1.  Pour the water into a large bowl. Add the chickpea flour and whisk until well combined. Cover the bowl with a plate or lid and let ferment at room temperature for 12 hours.

2.  Stretch a piece of cheesecloth across another large bowl and secure with a rubber band. Pour the chickpea batter through the cheesecloth into the bowl. This may take a little time and patience. It helps to have a rubber spatula handy to periodically scrape the the cheesecloth to remove the chickpea sediment. Compost the chickpea sediment. Cover the bowl of broth and let ferment for 3 hours at room temperature.

3.  Pour the oil into a heavy pot and rub it around to coat the bottom and sides. Stir the chickpea broth and pour all of it into the pot. Stir in the salt and turmeric.

4.  Bring the mixture to a boil over high heat, then reduce the heat to medium-low and cook at a slow boil until thickened and slightly reduced, 20 to 25 minutes. Stir continuously with a spatula to keep the mixture from sticking to the bottom of the pot.

5.  Remove the pot from the heat and serve the soup immediately, topped with a drizzle of hot sauce, if you like, and your favorite fresh toppings.


Make Fermented Garlic Paste

Garlic Trials at Ferment Works

Fermented garlic is the ultimate in probiotic convenience food. No, really, if you spend a little time fermenting something you want it to be garlic. Full disclosure: fermenting garlic takes a bit of time—there is all the peeling! Please don’t stop reading though a) its so worth it and b) you’ve got this!

Think about those big jars of minced garlic that are steeped in citric acid that have a flat fresh flavor, not so with fermented garlic paste. This stuff is just as easy in that you can use garlic to your hearts desire at a moments notice. However, there is no comparison on flavor and the added bonus is its live and probiotic. I know, sounding a bit like a used car salesman, but I want you to try lacto fermenting garlic. We are totally addicted to the stuff. One more small advantage to fermented garlic is that in the way it the part of garlic that lingers in your mouth and on your breath. (This has to do with the allicin being an unstable compound, but there are many chemical things at work here.) The important part is you can get away with eating raw garlic without turning everyone away! (Garlic lovers—how cool is that?

This post is to encourage you and to share a recipe for fermented garlic paste, but it is more fun than that. Last fall my farmer friend (and instigator) Mary, brought over 9 types of garlic. She grows seed garlic at Whistling Duck Farm. We did some trials to see how garlic changed with the different varieties. You can see some detailed results on a post I did for Mother Earth News . We used a pound of each variety to ferment in brine as whole clove pickle. And used another pound for fermented garlic paste. We did it all in one day to keep all the factors as even as possible, and for those of you doing the math—that was 18 pounds of garlic peeling!

One of the most fascinating parts of the experiment was seeing the distinguishing characteristics of a fresh variety of garlic might come out totally different when fermented. Fermenting brings out entirely new flavors—even within the same variety the whole clove ferment vs. the fermented paste can be very diverse. The first variance was that the jars all fermented at their own rate. A week in we had an array of colors among the pastes from unchanged to light pink and yellow yet after the fermentation period they all settled on a coppery orange color.  Some of the spiciest varieties mellowed out and some of the sweetest varieties took on some heat. The take away, though, is ferment your garlic—all varieties are good! (And for those of you reading this and sad that it is springtime and all the fresh cloves are past you can also ferment the scapes (the flower stem of garlic that is clipped in order to send more energy to the bulb.)

Garlic Paste

Yield: about 1 pint

6–8 heads garlic, cloves separated, peeled, and minced in a food processor

2 teaspoons salt

Process the garlic and the salt to a paste consistency in a food processor. This paste has a sticky, thick gooey consistency. You won’t see a release of brine, in fact you won’t really see a change. Don’t worry—it will work.

Top the ferment with a quart-sized ziplock bag. Press the plastic down onto the top of the ferment, and then fill it with water and seal. This will act as both follower and weight. Set aside out of direct sunlight in a cool spot (55 to 75°F), for 14 to 21 days.

While you monitor this ferment watch for air pockets. While there isn’t much lift action by the CO2 there is some, you will want to press down as needed. We have found that sometimes you can get a bitter, or even chemical flavor which seems to be a result of the trapped CO2 pockets. If you find this has happened stir the paste, press down, and allow it to ferment a few more days. It will right itself. If it still tastes bitter. Again stir the paste, this time place in fridge for a week and the undesirable flavor will dissipate.

Test the ferment on day 14. It's ready when the garlic is milder than when it’s raw, and has a mild acidity.

Tighten the lid and store in the fridge. This ferment will keep refrigerated for a year, though you will use it up much sooner than that.


Fermentation Magazines

Updated: February 15, 2021

This post was first written when the fermentation community was anticipating a “big kid” magazine. All of us in the community thought we were growing up, hitting the big time. This new magazine —a visually evocative, sensually stimulating magazine called CURED crash-landed with just one issue. Just one issue! At its heart was food preservation—you know, the stuff we geek out about all the time. Its focus was to be how humans have kept their food nutrient-rich, available and (hopefully) flavorful through the lean times, whether for surviving the next season or for a long journey. Fermentation was a big player in this new publication’s look at these ancient techniques through science, art, culture and travel.

Why am I leaving this post up? Partly to archive what this dream looked like. I think for the most part the existence of CURED exists only in the minds of those who were involved. The folks at Ogden Publications, who have given us Mother Earth News Magazine, for around half a century also tried.

Fermentation described itself as a premium quality magazine that covers the history, production, uses, science and health effects of fermented foods across cultures and generations. Content will include in-depth cultural and scientific histories, newsworthy and noteworthy current events, profiles of noteworthy fermented food creators, recipes for using fermented foods, instruction for creating fermented food safely, instruction on procuring or isolating appropriate microbial cultures, instruction for creating or procuring appropriate tools required for making your own ferments. The magazine will satisfy the needs and curiosities of beginners through advanced practitioners and will provide the reasons and science behind the ferments to the entire audience. Kirsten and many of my colleagues were on the advisory board. Again we applauded this step for the community.

This effort lasted for four information packed issues. Then Covid-19 hit and suddenly it was gone.

Okay, let’s go back in time to this post and meet its editor, Darra. Darra incidently is still doing wonderful things and her latest book Beyond the North Wind has a wonderful chapter on Russian fermentation. (Remember it started with feeling like big kids.)

…I want you to think about this for a moment because this is a milestone. We’ve hit a point where we have got a lush magazine (as in heavy paper and jaw dropping visuals) being launched by an established media company, Zero Point Zero Productions (who has given us Anthony Bourdain: Parts Unknown and Mind of a Chef) with a strong editor at the helm—Darra Goldstein. Darra is an award-winning cookbook author, world-renowned food scholar, and founding editor of Gastronomica.

Darra Goldstein photo by Stefan Wettainen

Darra Goldstein photo by Stefan Wettainen

Recently, Christopher and I had the opportunity to talk with Darra in a delightful conversation that meandered through time periods. Darra effortlessly guided us from a late 19th century banished Russian nobleman who observed that “sour” foods kept the peasants healthy to the modern allure of the bright packaging of industrialized food juxtaposed with the rediscovery of these ancient techniques having a certain luxury associated with them.

After the New York Times article (about CURED's debut) was published, Darra’s inbox lit up with email from folks all over the country who told her about their regional fermentation groups. She said, “there is an interesting subculture that is no longer marginal; it is really out there. Preservation has become much more mainstream but there is still a lot more to discover, particularly about other traditions of fermentation throughout the world.”

From our conversation we got a sense that it is this discovery that moves Darra. She is excited by the opportunity with CURED to take the DIY movement to a deeper level by bringing to the table the stories behind our preserved foods. CURED will seek to choose foods that we may or may not still eat and ask, what is the culture that surrounds it? What is the lore? What are the exigencies? How were these things created?

So what do we have to look forward to? Darra shared a sampling of some of the voices that will be heard. "There will be a wonderful article by Moises Valasquez-Manoff looking at the gut microbiome and probiotics. He went through many studies to try to determine if there is quantifiable scientific evidence and," Darra said, "everything points to something pretty intriguing."

There will be articles exploring Asian fermentation such as Japanese Zukemono, and a profile piece on Los Angeles chef Kwang Uh, whose kitchen uses a strong dose of fermentation, and there will be a piece on persimmon vinegar (can't wait to see that myself) by Edward Lee.

We had to ask, will there be recipes? While CURED is not a recipe-driven publication it will have recipes. "Recipes," said Darra, "are an important part of the story. A recipe tells the story in a different format and is like a continuation of the narrative that precedes it." All of the recipes are tested in CURED’s test kitchen in NYC but that doesn’t mean they will all be the centerpiece of your next dinner party. In part because some may not conform to the modern palate and in part because as we all know, fermentation doesn’t always conform to a consistent recipe.

She shared a wonderful example of a recipe by food historian Charles Perry for a medieval Persian cheese. In ancient Bagdad, yogurt and salt were added to milk that was then left on the roof to cure in the summertime. It works perfectly in Los Angeles, where the humidity is low. On a rooftop in NYC the summer humidity causes this to behave quite differently. And at Darra’s home in rural Massachusetts where the humidity is lower it is different yet again—but that is the wonder and beauty of it of it all now isn’t it?

Head over to CURED and put your name on the list to find out when it can be ordered. We sure did!

Coming out World Series Game 6


Dear Fermentista,

I've got two questions for you, one technical and one more of a social kind of thing. First the easy one. Lucille and I have been together for a long time now and she has gotten me through a lot—lost jobs, car accident recovery and two wives. Lucille is a kegerator that I built during my college days from an old refrigerator left out on the curb. She has been with me through thick and thin. The past few years there's been a lot more of the thick. So, it was like February, when my girlfriend made me try real kraut. Man was it good! I just dove in. Now I have a couple of crocks going all the time, and I bring jars of the stuff to my buddies on the site. I love trying new things, especially anything hot or with smoked salts. Anyways, I make so much of the stuff that I need a place to keep it so I moved my keg out and started using Lucille. That was about the time the season started. What I need to know is what temperature should I keep Lucille at? Are krauts more like a Stout or a Pale Ale?

Second question: Do you have any advice for how I am going to talk about this to the guys when they come over for game 6 at my place? Most of them don't rib me anymore about eating because now that they are hooked on the stuff too but they don't know about Lucille's makeover.  I know the first time somebody tries to pull one and gets nothing and then opens that door they are going to give me some s***.

Go Mets!
Michael

______________________

Dear Michael,

As you know, a big part of pouring that perfect glass is managing the temperature of the beer because of the relationship between temperature and CO2. I suspect that is why you asked if it’s more like a pale ale than a stout because different beers absorb and hold CO2 at different temps. For your krauts and pickles you should think of them as at least a Lager but best as a Brown Ale, ie. 45° F to 40° F. Stouts at 50° F is getting too close to a temperature that allows the bacteria to wake up and start working, which means your ferments will continue to get sour and build up CO2 in your jars. 

Your second question is easy—there will be no game 6. Sorry. I should explain I was born in KC, George Brett was my hero growing up. I wore that stupid plastic batting helmet through those muggy hot summer days until my brother shattered it one day with a bat while it was still on my head. I firmly believe you will not have this problem as the Royals will take the next two games. Sorry.

Hopefully Kirsten won't see this post as she grew up in New York State and always roots for the underdog...

~Christopher

Fermenting Scorzonera

scorzonera ready for fermentation .JPG

Looking to ferment something new? Try Scorzonera hispanica, also called black salsify, is a member of the sunflower family, has quite a few folk names; two of the more colorful are viper’s grass and goat’s beard. Having sons, we saw viper’s grass as an opportunity to entice them with a fermented creation. Snaky words usually appeal to the boy-child set: hence, our Viper Kraut.

Although native to southern Europe, black salsify is eaten predominantly in Germany and the Netherlands. Scorzonera is a perennial, and as long ago as the 1600’s it became more popular than white salsify, an annual. (White salsify, Tragopogon porrifolius, is also known as oyster plant, because of its flavor and texture.) Unlike white salsify, black salsify stays firm when you handle or cook it. Raw, it’s crunchy, with a texture almost like that of coconut with a flavor slightly reminiscent of asparagus. That same crunch and texture makes it an excellent candidate for fermentation.

Okay, here is where we admit it is rare—as in hard to find at the market. So much so that this delicious little carrot shaped root was cut from our book. That said, it is none-the-less out there. We often see it at farmers’ markets—look for the farmer that has the unique and unusual veggies—there is always one that is pushing outside the heirloom tomato box. Of course, you can grow your own.

The roots of scorzonera, or black salsify, are black, sticky, usually dirty, and a bit gnarled, so as a food, in a word, ugly. As a bonus (for the kids, maybe not for the cook), as you clean and peel, your hands will turn sticky and icky colored (orange or brownish black) as well, though that comes off easily when you wash.

Have fun with this ugly duckling: it turns into a swan in the crock.

As soon as you peel the roots, drop them in cool water with lemon juice; this will keep them from turning gray.

You can make a tasty, pure scorzonera ferment, but because of the size of the roots (not big), it’s a lot of work for a small return. Instead, shred the root or make ribbon-like strips with a peeler to dress up a plain sauerkraut. These universal kraut instructions are for just that.

Use the roots peeled and whole in brine pickles as part of a vegetable medley or solo with your favorite pickling spices.

Here is a refresher on how to set up a jar to ferment your veggies.

Fermented Fennel Cranberry Chutney

Lacto fermented fennel recipe below

Lacto fermented fennel recipe below

I taught a class where we made fermented Fennel Cranberry Chutney at the Farm to Fermentation Festival* in Santa Rosa, CA. This festival is near and dear to my heart as it is the first fermentation festival I’d ever been to back in 2011. In 2011 it was called the Freestone Fermentation Festival, which I wrote about extensively on this blog—the symposium, the feast, and the fest. The event has changed but is at its core still a wonderful way for people to explore the wonderful world of fermented foods and libations. 

The best part—always—is meeting and teaching you, the people, how to ferment vegetables.  [Since this post the world has moved to pandemic measures and no in person gathering. I miss the gatherings and live classes but I do love that my teaching is now available to anyone with an internet connection. Click here for my online vegetable fermentation classes hosted at Fermentation School.)

This recipe is in Fermented Vegetables but I made a pint size version for the class that I want to share here.This ferment is mild, sweet, and delicious and a friendly flavor for those who are less sure about fermented vegetables in their diet. This is particularly good with poultry—as an addition to a chicken salad or along side grilled chicken.

Fermented Fennel Chutney


Makes 1 pint

This version uses optional pure cranberry juice. The juice adds a little more flavor complexity, pink color and brine. The recipe works either way.

1 bulb fennel, sliced finely, tough parts of core removed
1 small to medium sweet onion, slice finely
3 cloves garlic, minced
¼ cup dried cranberries
2 tablespoons raisins
1 teaspoon salt
optional:
2 tablespoons pure cranberry juice (the kind with nothing added)

Remove the fennel stalks (save for adding to soup stock) and any tough parts of the core. Slice the fennel and onions as thinly as possible; mince the garlic and place in bowl. Sprinkle in the salt and massage it in to release the juices. Add the cranberries and raisins. At this point you should have a moist mixture. Press into your favorite fermentation vessel. Follow the instructions that come with that method. Otherwise choose a jar that is just the right size.


Press the vegetables into the jar; there will be only a small amount of brine. Don’t worry if it “disappears” between pressings. As long as the relish is damp, you have enough. At this point you can add the optional cranberry juice—it will give you more brine and a nice pink color.
When you have pressed the chutney into the jar releasing air pockets, press a piece of plastic wrap against the surface, again without trapping any air. Screw a lid tightly on the jar.


Put this in a corner of the kitchen to cure. Watch for air pockets forming in the paste. If you see them, open the lid and press the paste back down. If the lid starts to bubble up, simply open the lid for a moment to “burp” the ferment. 


Allow to ferment for 7 days. You will know it is ready when the color of the ferment has become dull and there is a slight pickle-y flavor.


During storage, the less airspace above a ferment the longer it will last, so fill the jars to the rim and transfer the ferment to smaller jars as you use it. Keep a small round of plastic wrap or wax paper directly on top of the paste to prevent evaporation and contamination. Tighten the lids and store in fridge. This ferment will keep refrigerated for 6 months.

*Since the writing of this post this festival in any form is no longer happening.