lacto fermentation

How to Ferment Asparagus Pickles Video

We love asparagus season and are always sad when it is over. Fermentation happens to be a fantastic way to extend the season and eat local asparagus for months. 

In the above video you see just how simple it is to make asparagus pickles through a simple lacto fermentation process.

Make them now, show off later

Let’s admit it. Not all vegetable ferments are visually created equal. Bring a big jar of sauerkraut from those cabbages you nurtured all summer, fighting off aphids as they slowly grew within their leaves to the point you could harvest. Yet in the jar, it looks like, you know, sauerkraut. Tastes amazing! That’s when you learn, as you watch people pass by your sauerkraut at the potluck, that people first taste with their eyes. So with that in mind, turn up the visual flavor!

Need more?

If you watch the video above and still want more before making your first batch here are two options. First, you can purchase our first book, Fermented Vegetables, which has a simple recipe for Asparagus Pickles along with at least 64 other vegetables. Alternately, you could take a personal online course from us, Here are two great choices below.

Fermentistas: Beware the Storage Cabbage!

Dry, tough storage cabbage that doesn't easily release a juicy brine

Dry, tough storage cabbage that doesn't easily release a juicy brine

Let’s talk about fermenting storage cabbages. Last week I taught a hands-on class. I’d bought each student a beautiful small head of cabbage. Later, that evening during the demonstration portion of the class, I realized that the students would have to make their first ferment with rebellious cabbage.

Here’s the thing: as I stand in front of the impressionable new fermenters, I am often slicing, salting and then massaging a cabbage while talking. (No, I can’t pat my head and rub my belly at the same time but I can talk and build a jar of sauerkraut at the same time.) So it throws me off when I am massaging and telling the good people about brine and the cabbage refuses to give it up. I continue to talk as I am working harder and harder, smiling, trying to make it look effortless.

In this case, they were about to use the cabbages themselves so I stopped and said, “You guys are going to have fun with this cabbage; it’s a tough storage cabbage, you will want to make sure to take your time and slice it thinly.” (Which was a challenge as the venue had provided everyone with boning knives, but that is beside the point.) “The good news is, this is about as hard as making kraut will ever be, so it’s smooth sailing from here.”

Let me digress a moment to share a story about the first time I’d learned that storage cabbages can be a problem for fermenting. The lack of inherent moisture, the thick waxy leaves, all the qualities that keep these cabbages from rotting in storage are exactly what inhibit the fermentation, because what is fermentation if not controlled rot? In the following tale of a small sauerkraut company and the Storage No. 4 cabbage variety this lesson was learned—the hard way.

This small company I speak of operates with the triple bottom line and is exceedingly committed to supporting the local foodshed by using only local ingredients when in season. So when one of the local farmers came to the company with the idea to provide cabbages for a longer season by growing a keeper that was harvested in the fall and capable of surviving storage through the spring it seemed like a win-win situation. The kraut company would have local cabbage in the late winter and early spring for production. The farm would also extend its income stream. Done. Acres and acres were planted. The cabbages did what cabbages do and grew and grew. They were harvested and stored and eventually processed and set in fermenting barrels as needed to keep supplies fresh and abundant. When the first barrels were opened after three weeks, the cabbage had not yet fermented. At first this was strange but can happen so they closed the barrel and allowed more time. Eventually, after waiting for a few months they had to concede that this kraut wasn’t going to be good.

You are most likely to run into these cabbages in grocery stores in February, March, and into April when the winter cabbages are sold and the spring cabbages have not yet matured. It is hard to tell at first glance, and even upon deeper inspection it can be confusing. I admit, when I am out buying cabbage I look for crisp and fresh, not wilted, but I don’t even think about checking the head for signs of being a storage variety cabbage. And while I want you to know all about these varietals, this post is really about what to do when you find yourself with a tough cabbage—you may discover this when you are slicing through extremely dense interiors with thicker, waxier leaves, or later when you are squishing along and not seeing brine.

Tips for a successful ferment with a dry, coarse cabbage:

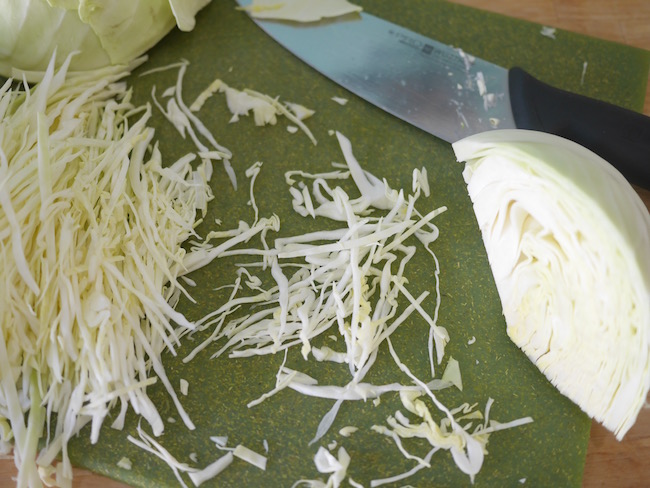
·      Slice as thinly as possible (breaking more cell walls)

·      Add salt, mix thoroughly, and allow to sit for a half hour before massaging (will break down the tough leaves and coax out moisture)

·      Make a mixed-veggie kraut instead of a plain, naked cabbage kraut (other veggies will bring their juice to the mix and help create enough brine to allow the microbes to do their job)

thin cabbage shreds for fermenting a dry cabbage
Favorite veggies for a juicier kraut: Onions, shredded carrots, shredded beets, shredded turnips (these will give you a flavor the most consistent with a plain kraut), and other shredded root veggies. Pictured here is Curtido (recipe in Fermented Ve…

Favorite veggies for a juicier kraut: Onions, shredded carrots, shredded beets, shredded turnips (these will give you a flavor the most consistent with a plain kraut), and other shredded root veggies. Pictured here is Curtido (recipe in Fermented Vegetables) it is delicious and the many onions create a juicy brine.

Make Fermented Garlic Paste

Garlic Trials at Ferment Works

Fermented garlic is the ultimate in probiotic convenience food. No, really, if you spend a little time fermenting something you want it to be garlic. Full disclosure: fermenting garlic takes a bit of time—there is all the peeling! Please don’t stop reading though a) its so worth it and b) you’ve got this!

Think about those big jars of minced garlic that are steeped in citric acid that have a flat fresh flavor, not so with fermented garlic paste. This stuff is just as easy in that you can use garlic to your hearts desire at a moments notice. However, there is no comparison on flavor and the added bonus is its live and probiotic. I know, sounding a bit like a used car salesman, but I want you to try lacto fermenting garlic. We are totally addicted to the stuff. One more small advantage to fermented garlic is that in the way it the part of garlic that lingers in your mouth and on your breath. (This has to do with the allicin being an unstable compound, but there are many chemical things at work here.) The important part is you can get away with eating raw garlic without turning everyone away! (Garlic lovers—how cool is that?

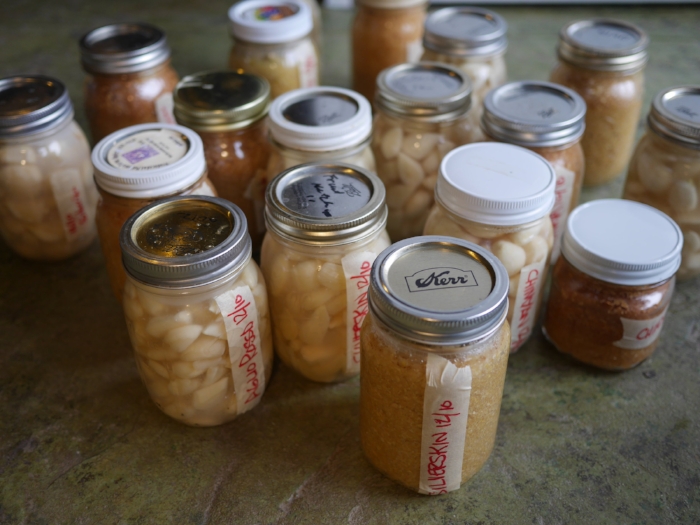
This post is to encourage you and to share a recipe for fermented garlic paste, but it is more fun than that. Last fall my farmer friend (and instigator) Mary, brought over 9 types of garlic. She grows seed garlic at Whistling Duck Farm. We did some trials to see how garlic changed with the different varieties. You can see some detailed results on a post I did for Mother Earth News . We used a pound of each variety to ferment in brine as whole clove pickle. And used another pound for fermented garlic paste. We did it all in one day to keep all the factors as even as possible, and for those of you doing the math—that was 18 pounds of garlic peeling!

One of the most fascinating parts of the experiment was seeing the distinguishing characteristics of a fresh variety of garlic might come out totally different when fermented. Fermenting brings out entirely new flavors—even within the same variety the whole clove ferment vs. the fermented paste can be very diverse. The first variance was that the jars all fermented at their own rate. A week in we had an array of colors among the pastes from unchanged to light pink and yellow yet after the fermentation period they all settled on a coppery orange color.  Some of the spiciest varieties mellowed out and some of the sweetest varieties took on some heat. The take away, though, is ferment your garlic—all varieties are good! (And for those of you reading this and sad that it is springtime and all the fresh cloves are past you can also ferment the scapes (the flower stem of garlic that is clipped in order to send more energy to the bulb.)

Garlic Paste

Yield: about 1 pint

6–8 heads garlic, cloves separated, peeled, and minced in a food processor

2 teaspoons salt

Process the garlic and the salt to a paste consistency in a food processor. This paste has a sticky, thick gooey consistency. You won’t see a release of brine, in fact you won’t really see a change. Don’t worry—it will work.

Top the ferment with a quart-sized ziplock bag. Press the plastic down onto the top of the ferment, and then fill it with water and seal. This will act as both follower and weight. Set aside out of direct sunlight in a cool spot (55 to 75°F), for 14 to 21 days.

While you monitor this ferment watch for air pockets. While there isn’t much lift action by the CO2 there is some, you will want to press down as needed. We have found that sometimes you can get a bitter, or even chemical flavor which seems to be a result of the trapped CO2 pockets. If you find this has happened stir the paste, press down, and allow it to ferment a few more days. It will right itself. If it still tastes bitter. Again stir the paste, this time place in fridge for a week and the undesirable flavor will dissipate.

Test the ferment on day 14. It's ready when the garlic is milder than when it’s raw, and has a mild acidity.

Tighten the lid and store in the fridge. This ferment will keep refrigerated for a year, though you will use it up much sooner than that.


Fermenting Scorzonera

scorzonera ready for fermentation .JPG

Looking to ferment something new? Try Scorzonera hispanica, also called black salsify, is a member of the sunflower family, has quite a few folk names; two of the more colorful are viper’s grass and goat’s beard. Having sons, we saw viper’s grass as an opportunity to entice them with a fermented creation. Snaky words usually appeal to the boy-child set: hence, our Viper Kraut.

Although native to southern Europe, black salsify is eaten predominantly in Germany and the Netherlands. Scorzonera is a perennial, and as long ago as the 1600’s it became more popular than white salsify, an annual. (White salsify, Tragopogon porrifolius, is also known as oyster plant, because of its flavor and texture.) Unlike white salsify, black salsify stays firm when you handle or cook it. Raw, it’s crunchy, with a texture almost like that of coconut with a flavor slightly reminiscent of asparagus. That same crunch and texture makes it an excellent candidate for fermentation.

Okay, here is where we admit it is rare—as in hard to find at the market. So much so that this delicious little carrot shaped root was cut from our book. That said, it is none-the-less out there. We often see it at farmers’ markets—look for the farmer that has the unique and unusual veggies—there is always one that is pushing outside the heirloom tomato box. Of course, you can grow your own.

The roots of scorzonera, or black salsify, are black, sticky, usually dirty, and a bit gnarled, so as a food, in a word, ugly. As a bonus (for the kids, maybe not for the cook), as you clean and peel, your hands will turn sticky and icky colored (orange or brownish black) as well, though that comes off easily when you wash.

Have fun with this ugly duckling: it turns into a swan in the crock.

As soon as you peel the roots, drop them in cool water with lemon juice; this will keep them from turning gray.

You can make a tasty, pure scorzonera ferment, but because of the size of the roots (not big), it’s a lot of work for a small return. Instead, shred the root or make ribbon-like strips with a peeler to dress up a plain sauerkraut. These universal kraut instructions are for just that.

Use the roots peeled and whole in brine pickles as part of a vegetable medley or solo with your favorite pickling spices.

Here is a refresher on how to set up a jar to ferment your veggies.

What came first, the ferment or the pot?

Traditional style fermentation crock made by Jeremy Ogusky. The lid on this design functions as a follower and must be weighted with a water filled jar and topped with a cloth. If you shop talk to Jeremy about the lid style that best fits your needs. 

A few lucky folks are given a fermentation crock as a gift and they think, hmmm, maybe I should try this thing called vegetable fermentation. They often end up at our classes (or learning with our book at their side). However for most of us, when the fermentation bug hits, the first thing we do is find a vessel—a jar or a crock. This often means a visit to the local kitchen store or online shopping. For Jeremy Ogusky, a Boston potter, this wasn’t an issue. He simply made himself a crock. (Who doesn’t wish they could do that.) He then made a few more for friends and family. After awhile a tiny housewares company, Williams-Sonoma, contacted him and offered to contract with him for hand-thrown clay crocks. You can watch him here.  He said yes and realized this is fermentation’s moment to shine. Instead of just sitting in the studio turning out hundreds of crocks, Jeremy leapt into the brine—championing fermentation as well. 

When I spoke to Jeremy what struck me most was his intense interest and skill in collaboration and connections. Fermentation pulls people together. Jeremy found the paths of folks with very different interests intersecting with fermentation.  When he explained this I imagined roads—the thought paths of science, health, food lovers, food makers, artists, farmers, preservationists, urban homesteaders, DIY—converging from all directions at a giant handmade clay crock of fermented vegetables. (A bit like all the roads that led to Rome.)

For the past five years Jeremy has cultivated his role as a thought leader in the fermentation renaissance by collaborating with many folks around Boston to bring this delicious food to the forefront. He is responsible for the group known as Boston Ferments which started out as a loose band of fermentation enthusiasts and has grown to a group that hosts the Boston Fermentation Festival, fermentation workshops, fermentation themed dinners in restaurants, and Kraut Mobs. (Yes, “mobsters” show up at farmer’s markets or food festivals with 50 pounds of cabbage, cutting boards, knives, bowls, salt and jars and invite people to make sauerkraut.) 

For Jeremy, who's first career path was public health, the clay work blends well with his interest in nourishing food. He is interested in the intersections of his own work with clay and fermentation. Clay working is one of our oldest crafts—born solely for function, vessels in which to cook, serve and store (or preserve) foodstuffs. You can see where this is going. If fermentation is one of the oldest methods of preservation, one has to ask what came first? Did we ferment once we had pots or did we create vessels to help our fermentations?

Handmade stoneware began as utility but now it is often sold as art. As many of my readers know I appreciate functional art. I find that these fun and beautiful tools with a story inspire the food I create. 
 
On our counter, Jeremy’s faded denim-colored crock boldly proclaims, “ferment.” This is more than just a label of the contents within—this word also reminds us to slow down and take time. Find the comfort in allowing your ideas and projects, (or vegetables) to sit quietly before breaking out in a bubbling frenzy of creativity (or taste).


When your cabbage is dry? Sauerkraut brining flowchart

We believe the best sauerkraut (cabbage or other vegetables) comes from dry brining. What does that mean? Fair question since the whole point is to make brine in which to submerge the fermenting vegetables. Dry brining simply means creating the brine in fermentation by only adding salt and allowing the vegetable’s natural juices to create the important liquid. No water is added.

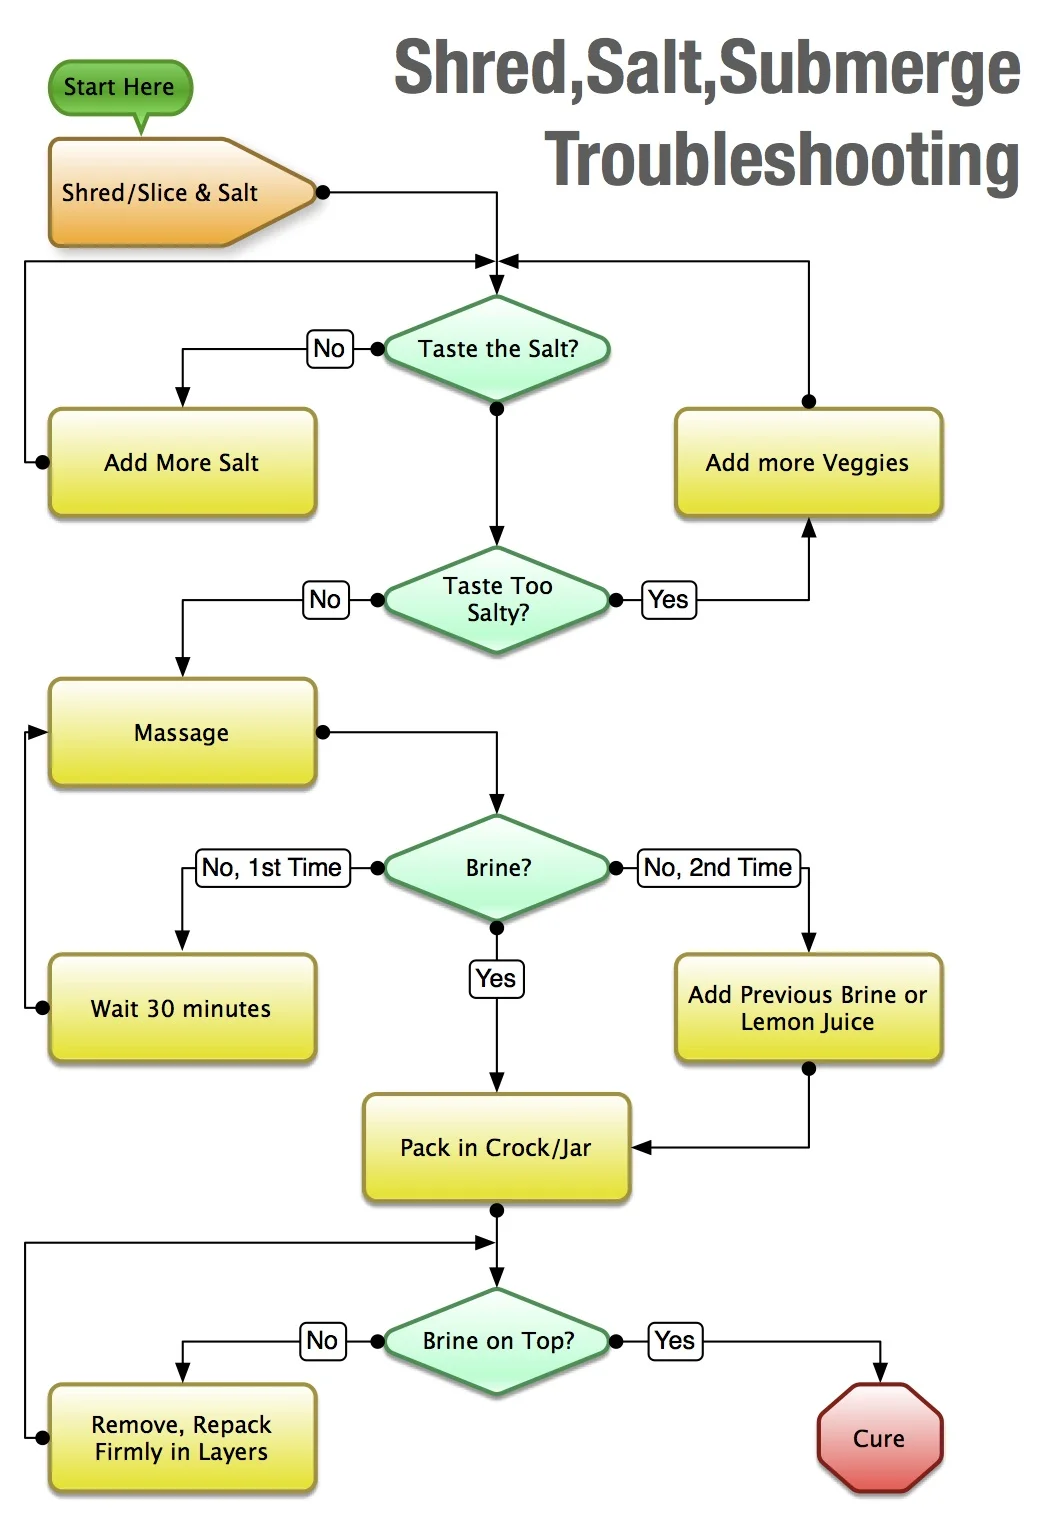
This usually works. Once in a while, you are faced with dry cabbages (maybe they were in cold storage too long) and it doesn't work. Oh, what to do? We have created this handy flow chart to help you when you are feeling there is just not enough brine to properly ferment your creation.

If you would like more help check out our simple course on making sauerkraut and pickles, safely and simply. Got your basic game down already? Maybe it’s time to progress to mastering the process.

Handy flowchart to help you make a delicious brine for your sauerkraut (and other fermented vegetables).

Handy flowchart to help you make a delicious brine for your sauerkraut (and other fermented vegetables).

Let’s walk through this flowchart, adding some hints along the way.

Start by shredding or slicing your cabbage, then adding the salt, but here is a hint. If all of your cabbage is in the bowl and you salt it and its too salty the flowchart says to add more vegetables. If you only want a cabbage kraut and aren’t interested in dropping in some carrots, onions or the like then don’t add all the salt you intend, then taste. If you don’t taste the salt you can continue adding but if you do you saved yourself heading out to the store for another cabbage before continuing.

How long to massage. In out experience the one getting the massage wants it to last longer than the one giving the massage but that might just be us. For the cabbage a perfect massage is until it starts giving up its water that just before had been locked up in its cabbage cells. Your shredding opened a lot of those up, your massaging continues the trick.

Sometimes there is a delay so that’s why the 30 minute rest break. If you still don’t see enough brine then its time to add some good brine or lemon juice. Why lemon juice? We want the acidity. That’s why we never just add some tap water, never.

Finally you pack your lovely creation away in a jar or crock and wait. When you pack one trick is to do it in layers, rather than just dumping it all in at once. Spoon in a layer, squish down, then repeat as you fill the container. You have a couple of options at this point before setting it on your counter and waiting for yumm.

Micro-fermenting :: Small Batch Vegetable Fermentation

Small batch vegetable fermenting followers. Note the veggies are submerged! Photo by Josh Ratza.

Small batch vegetable fermenting followers. Note the veggies are submerged! Photo by Josh Ratza.

Our collective stereotype for sauerkraut production comes from a different time and place—giant wood barrels or huge heavy crocks lining the edge of root cellars, that sour-krauty, pickled fragrance permeating the cool dark air. This mental image of what it means to make sauerkraut, while romantic in its self-sufficient, simpler time, homsestead-y way, is not how most home ferments are made. Most people do not want a committed relationship with five gallons of “sauering” cabbage.

It doesn’t have to be like this. Whatever the reason—a small kitchen, a small refrigerator, single or the single fermentation fan in the family, or simply the fun of experimentation and the desire to have a rotating variety of fermented salads in the refrigerator—small is beautiful.

And small requires certain considerations. Let’s start with the large crock of vegetables tucked away to ferment for three weeks—there is mass. This mass of the cabbage bulk helps keeps the weighted ferment under the brine. 

This isn’t how it is for small and tiny batches. They will need more baby-sitting. However, with a few management strategies your pint-sized ferment will work, it will be fairly easy and it will turnout delicious.

Keeping track of your brine

Because your ferment is small, it stands to reason you have less brine—remember this salty liquid is your kraut’s anaerobic armor. And keeping this brine in the ferment where it belongs will require a bit more attention while your ferment is curing. Often you will find yourself needing to press gently on your weight everyday. This will release the carbon dioxide bubbles that build up and bring the brine back into the ferment.

Submerging in brine: Conquers Evil Every time! This simple chant is all you need to remember to keep your vegetable ferments safe to eat. The rules for sauerkraut, kimchi and pickles apply to pastes, relishes, and other fermented condiments. To avoid a “krautastrophe” keep those veggies under the brine. Some of these condiments, like herbal ferments, have much less brine, but there is still enough. Other condiments like salsas or pepper pastes have so much brine that it is hard to keep the veggies from floating to the surface. In either case it is just a matter of managing the brine. 

The other challenge is simply weighing down the ferment. Small ferments require small vessels and usually this means the time honored mason jar. (We won’t talk about how many of these jars we own.) So you have salted and pressed your veggies tightly in the jar and you have left about 2 inches of headspace for the brine to expand (but not pour out) as fermentation happens. Now it is time to make sure they stay that way.  There are many strategies and many creative folks that have made air-lock lids for jars. 

The water-filled ziplock bag is a common method (explained in this previous recipe post) but about a year ago I discovered an alternative to plastic. Stoneware followers made for jars—whole (pictured for wide mouth jars) or split “stones" (for regular mouth jars). Josh Ratza has brought function and art together with the followers he designed for mason jars. Another potter with a unique weighting system is Mikael Kirkman.

Downsizing your recipes

We have found that to keep enough space for the follower, weight and brine it is best not to fill the jar to the shoulder. These weights are a guide to downsizing your ferment recipes and will keep your ferment in a good place. (Josh also includes a few small-size recipes if you buy his followers.) The salt quantities are 1.5 % of veggie weight, some people like a little more. A good rule of thumb is to taste it. You should be able to taste the salt. It should be pleasant and salty, but not briny like the ocean.

For a pint jar :: Use 3/4  pound of vegetables and 5 grams (or ½ teaspoon) salt.

For a quart jar :: Use 1  1/2pounds of vegetables and 10 grams (or 1 teaspoon) salt.